
How to Install SentinelOne on macOS (Step-by-Step Guide)
- Apr 21
- 3 min read
Installing SentinelOne on macOS is straightforward, but there are a few critical permission steps that must be completed or the agent will not fully protect the device.
This guide focuses on the easiest and recommended method using the installation wizard.
What You Need Before You Start
SentinelOne macOS installer (.pkg)
Your Site Token or Group Token
Admin access to the Mac
Step 1: Download the macOS Agent
Log into your SentinelOne console
Go to Packages
Download the latest macOS installer
Make sure it is scoped to the correct Site
Best practice is to download it directly to the Mac you’re installing on.

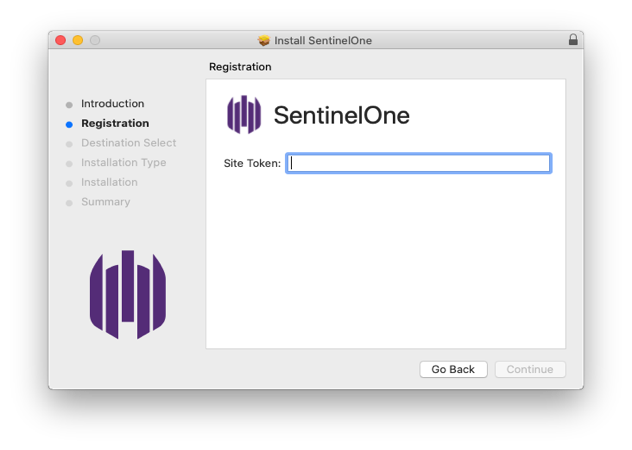
Step 2: Install Using the Wizard (Recommended)
This is the easiest and preferred method.
Open the .pkg installer
Follow the installation prompts
When prompted, enter your Site Token or Group Token
Complete the installation
That’s it. No command line needed.
This method is ideal for:
Single installs
Non-technical users
Quick deployments
Step 3: Approve Required macOS Permissions
This is the most important part of the entire install.
If you skip this, SentinelOne will not fully protect the Mac.
After installation, you may see:

“Needs user attention”
A. Full Disk Access (CRITICAL)
Open System Settings

Go to Privacy & Security

Click Full Disk Access
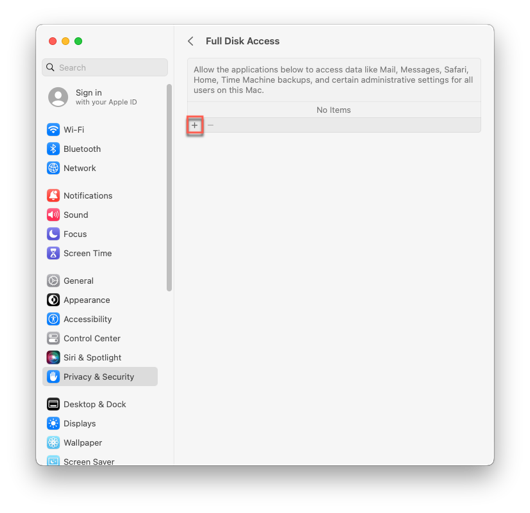
Press and hold Command+Shift+G at the same time to open the Go to the folder menu.

Enter the path: /Library/Sentinel/sentinel-agent.bundle/Contents/MacOS/Select the SentinelOne applications, and click Open:
sentineld.app
sentineld_helper.app
sentineld_shell.app


If you don’t do this:
SentinelOne cannot see all files
Detection is limited
B. Approve Network Extension
Go to System Settings → General → Login Items & Extensions
Scroll to Network Extensions
Enable SentinelOne
If prompted: Click Allow
If blocked:
Go to Privacy & Security
Find the “System Extension Blocked” message
Click Allow
If this isn’t approved:
Network protection will not work
Step 4: Verify Everything Is Working
SentinelOne icon should NOT show warnings
Device should appear in the console
No “Needs user attention” messages
Optional: Command Line Install (For Advanced / Automation)
This method is intended for:
IT admins
Scripting deployments
Remote or bulk installations
If you’re installing on a single Mac, the wizard is easier. If you’re automating, use this.
Step 1: Download the Installer
Log into SentinelOne
Go to Packages
Download the macOS .pkg installer
Ensure it is scoped to the correct Site
Save it locally on the endpoint.
Step 2: Create the Token File
The agent uses a token file to automatically register to your environment.
Open Terminal
Create the token file:
sudo nano /tmp/com.sentinelone.registration-tokenPaste your Site Token or Group Token into the file
Save and exit
Step 3: Set Correct Permissions
Set the file owner to root:
sudo chown root /tmp/com.sentinelone.registration-tokenThis is required or the installer may fail to register properly
Step 4: Run the Installer
Execute the install command:
sudo /usr/sbin/installer -pkg /path/to/Sentinel.pkg -target /Example:
sudo /usr/sbin/installer -pkg /Users/yourname/Desktop/Sentinel.pkg -target /Wait for the installation to complete.
Step 5: Approve macOS Permissions (Still Required)
Even with command line installs, you MUST still manually approve:
Full Disk Access
Network Extensions
If you skip this, the agent will not fully function
Step 6: Verify Installation
Confirm the device appears in the SentinelOne console
Check that there are no “Needs user attention” alerts
Notes for Automation
The token file must be present before installation runs
This method is commonly used with MDM tools
You can script the installer + token placement together
Common Issues
“Needs user attention”
You missed permissionsFix: Complete Full Disk Access and Network Extension
Device not showing in console
Token entered incorrectly
Installer not scoped to correct Site
Everything installed but not working
Restart the Mac
Recheck permissions
Important Notes
Permissions only need to be approved once
Updates do not require re-approval
macOS Ventura and Sonoma may have slightly different menus
Final Thoughts
The install itself is easy.
Permissions are what actually determine if you’re protected.
Do those right, and you’re good.
Note: If you need SentinelOne licensing or help deploying it across your business, we offer it through East Coast Cybersecurity, but the steps above apply no matter where you get it. https://www.eastcoastcybersecurity.com/endpointsecurity/buy-sentinelone-cybersecurity


Comments